Proper DWV (drainage, waste, and vent) testing is an essential component of any reliable and efficient residential plumbing system. Plumbing contractors must follow best practices to maintain these systems' functionality and avoid potential issues like blockages, leaks, and improper ventilation.
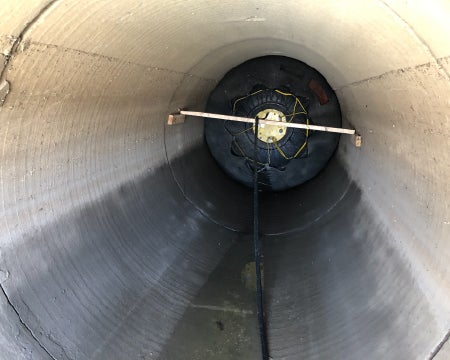
 When you test DWV systems with water, smoke, or air, pipe plugs are a common tool to isolate specific sections for inspection or pressure testing purposes. When using a pipe plug, you'll typically perform one of three essential tasks:
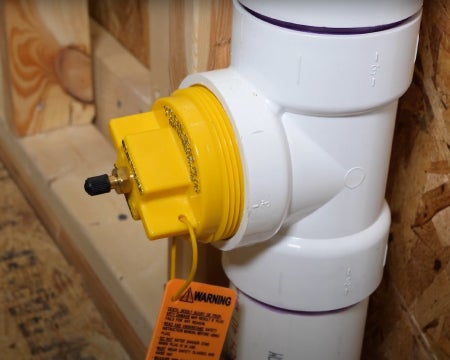
- Stopping the flow involves placing a pipe plug to halt the flow in a pipeline or opening. A blocking plug is typically used for this task. These can also serve as back plugs for sewer air tests. Test balls don't have a bypass and are designed to do one job: blocking (sealing) a pipe.
- Bypassing the flow involves using a pipe plug to redirect or bypass the flow running through the pipeline. Bypass/muni ball plugs are specifically designed for situations where a repair is needed while wastewater must continue to flow. These plugs can handle high back pressure in applications such as water mains, force mains, and industrial lines. A muni ball plug features a bypass tube that runs through the plug, allowing the user to divert effluent through the tube. By using an adapter cap, you can convert the muni ball plug to complete an air test.
- Performing a low-pressure air test involves testing a new pipeline before putting it into service or testing an already-in-service pipeline for leaks. A test pump inflates the test plugs during this process, sealing off the pipeline. By introducing low-pressure air into the pipeline, potential leaks can be identified.
When using a pipe plug for testing, it's critical to follow the manufacturer's instructions carefully to ensure proper insertion and a secure, airtight or watertight seal.
Let's explore some recommended guidelines when using plumbing pipe plugs during DWV system testing. By adhering to these guidelines, plumbing contractors can ensure peace of mind for homeowners who will know that their residential plumbing systems are functioning correctly.
Preparation
 To ensure a successful testing process, you must prioritize safety. Read the instructions provided by the plug manufacturer and understand the proper usage and safety precautions specific to the plug you are using.
Using a plug that fails for any reason can result in bodily injury, property damage, or even death. Unsafe practices can also lead to severe injuries or fatalities.
Here are some recommended best practices to consider:
1. Choose the right pipe plug
Determine the appropriate size and type of pipe plug for the specific application. Pipe plugs have a minimum and maximum sealing size range.
The first step is to determine the pipe's ID (inside diameter) to be plugged. Then, choose the plug that matches the ID of the pipe for that application. Some Cherne plugs can be used for multiple pipe sizes, but they should be used only on a pipe whose diameter falls within that size range. When in doubt, contact Cherne customer support.
2. Determine the maximum back pressure
It is important to determine the maximum back pressure the plug must withstand. Back pressure refers to the pressure (air or liquid) in front or behind the plug. Never exceed the plug's back pressure rating, which is measured in pounds per square inch (psi) or feet of head. Simply read the gauge pressure for psi. For the feet of head, calculate the water height over the plug's centerline.
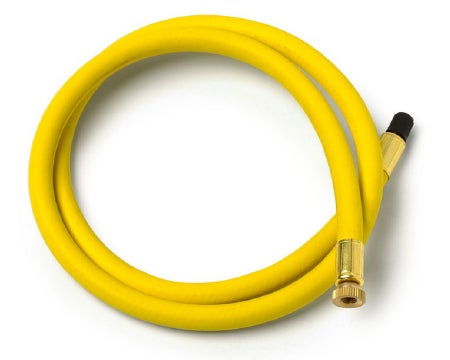
3. Use a calibrated gauge
Failure to use calibrated gauges can result in over-inflation or under-inflation of the plug, leading to plug failure. It's essential to monitor inflation and back pressure using only calibrated pressure gauges and the appropriate hoses.
Also, always monitor and inflate or deflate the plug from outside the danger zone. (See Item No. 5 below.) Cherne does not recommend using compressors to inflate smaller plugs.
4. Clean and inspect the plug and pipe
Plugs must be cleaned and inspected before and after each use. Do not use a plug if it shows wear or deterioration. Note that all natural rubber products degrade over time, even if used infrequently, are properly stored, and show no external signs of damage.
To clean plugs, use mild soap and water and store them in a dry place away from sunlight. After each use, inspect the plug for any signs of damage, such as cuts, abrasions, punctures, bulges, cracks, corrosion, loose or damaged fittings and components, or leaks.
If any damage is found, do not use the plug again.
Additionally, remove any debris or foreign substances before placing the plug. An unclean pipe can reduce the plug's ability to hold back pressure and may cause damage during placement or inflation.
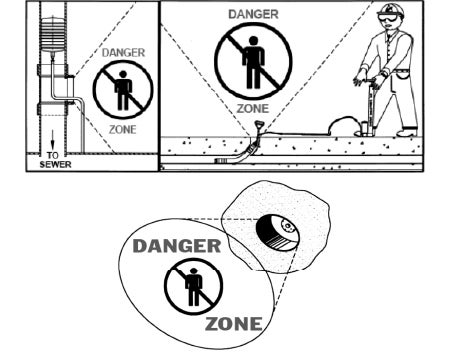
5. Always be aware of the Danger Zone
Never enter the Danger Zone while a plug is in use. A danger zone area expands outwardly in a cone shape from where the plug is. (See illustration.) The total force exerted on a pipeline plug is directly proportional to both the pressure and the pipeline area. The amount of force behind a plug can be overwhelming.
Operation
Pipe plug operation involves careful insertion, inflation, testing, and removal of the plug. Following proper procedures and adhering to manufacturer instructions can ensure safe and effective testing while minimizing the risk of damage or accidents.
- Insertion: Insert the pipe plug into the access point and inflate or expand it, depending on the plug type. Be sure to follow the manufacturer's instructions for insertion and expansion.
Never over- or under-inflate the plug. Position the plug into the pipe at a distance at least equal to the pipe diameter and use the correct media while inflating. - Testing: Once the pipe plug is securely in place and fully inflated or expanded, perform the desired test, such as a water- or low-pressure air test or a smoke test. Adhere to the recommended procedures outlined by the manufacturer when performing the testing. This may include the appropriate inflation pressure, monitoring the pressure during the test, and following specific steps for inflation and deflation. Deviating from these procedures can lead to inaccurate results and compromised safety.
- Leak inspection: While conducting the test, carefully monitor the test area for any signs of leaks or pressure loss. This involves visually inspecting the system, checking for visible water or air leaks, and paying attention to unusual sounds or pressure drops.
If you notice any leaks or pressure loss, stop the test immediately and take steps to address the issue. This may involve tightening fittings, repairing damaged pipes, or replacing faulty components. Continuing the test despite the presence of leaks can lead to inaccurate results and compromise the effectiveness of the testing process. - Removal: After completing the test, application, or use of the plug, it is important to remove it safely and in a controlled manner. Begin by standing outside the Danger Zone and releasing all the back pressure behind the plug. Once this pressure is released, relieve the plug pressure — again, standing outside the Danger Zone — until the plug is completely deflated.
It is crucial to always release the back pressure from the pipe before deflating the plug. Deflating the plug before releasing the back pressure can result in the plug dislodging at an extreme velocity, posing a safety risk.